진행하기 앞서 vuetify를 추가한다.
Vuetify는 vue 기반의 UI Framework으로 <v-btn>과 같이 사전 정의된 컴포넌트 및 레이아웃 라이브러리이다.
Vuetify is a no design skills required UI Framework with beautifully handcrafted Vue Components.
cd vubell
yarn add vuetify@^3.0.6
#vuetify 공식 홈페이지에서 material design icons를 언급해서 여기에도 설치하여 사용한다.
yarn add @mdi/font -D
electron vue app의 기본 호출 순서는 다음과 같다. (물론 babel과 webpack의 컴파일 및 빌드 과정 및 결과 js를 로드하는 것이긴 해도 개념상으로는 아래를 참고하는 것이 좋다.)
- yarn electron:serve (package.json)
- vue.config.js
- src/main.js
- src/App.vue
- … (사용되는 컴포넌트)
vuetify를 사용하려면 당연히 import나 require를 사용하여 로드하여야 한다. 여기서는 App.vue를 호출하는 main.js에 추가하겠다.
src/main.js
import { createApp } from 'vue'
import App from './App.vue'
import 'vuetify/styles'
import '@mdi/font/css/materialdesignicons.css'
import { createVuetify } from 'vuetify'
import * as components from 'vuetify/components'
import * as directives from 'vuetify/directives'
import { aliases, mdi } from 'vuetify/iconsets/mdi'

const vuetify = createVuetify({
  components,
  directives,
  theme: {defaultTheme: 'dark'},
  icons: {
    defaultSet: 'mdi',
    aliases,
    sets: {
      mdi,
    }
  }
})

createApp(App).use(vuetify).mount('#app')
먼저 입력 폼을 컴포넌트로 만든다.
Connection 정보 입력 기본 양식 컴포넌트
components/ConnectionCard.vue
<template>
  <v-card>
    <v-form>
      <v-card-text>Connection - SSH</v-card-text>
      <v-card-item>
        <v-row>
          <v-col cols="4">
            <v-text-field label="Alias"></v-text-field>
          </v-col>
          <v-col cols="6">
            <v-text-field label="Host Name (or IP address)"></v-text-field>
          </v-col>
          <v-col cols="2">
            <v-text-field label="port" type="number"></v-text-field>
          </v-col>
        </v-row>
        <v-row>
          <v-col cols="6">
            <v-text-field label="User ID"></v-text-field>
          </v-col>
          <v-col cols="6">
            <v-text-field label="Password" type="password"></v-text-field>
          </v-col>
        </v-row>
      </v-card-item>
    </v-form>
  </v-card>
</template>

<script>
export default {
  name: 'ConnectionCard',
}
</script>
Hello world를 보여주고 있는 App.vue를 수정하여 기본 레이아웃을 구성한다.
App.vue
<template>
  <v-app id="appRoot">
    <v-system-bar>
      <v-spacer></v-spacer>
      <v-icon>mdi-square</v-icon>
      <v-icon>mdi-circle</v-icon>
      <v-icon>mdi-triangle</v-icon>
    </v-system-bar>
    <v-navigation-drawer v-model="drawer">
      <v-sheet color="grey-lighten-4" class="pa-4">
        <v-avatar class="mb-4" color="grey-lighten-1" size="64"></v-avatar>
        <div>defree.inc@defree.co.kr</div>
      </v-sheet>
      <v-divider></v-divider>
      <v-list>
        <v-list-item v-for="[icon, text] in links" :key="icon" link>
          <template v-slot:prepend>
            <v-icon>{{ icon }}</v-icon>
          </template>
          <v-list-item-title>{{ text }}</v-list-item-title>
        </v-list-item>
      </v-list>
    </v-navigation-drawer>
    <v-main>
      <v-container class="py-8 px-6" fluid>
        <ConnectionCard/>
      </v-container>
    </v-main>
  </v-app>
</template>

<script>
import ConnectionCard from './components/ConnectionCard.vue'
export default {
  components: {
    ConnectionCard
  },
  data: () => ({
    drawer: null,
    links: [
      ['mdi-inbox-arrow-down', 'Connection'],
      ['mdi-send', 'Hosts'],
      ['mdi-delete', 'Trash'],
      ['mdi-alert-octagon', 'Span'],
    ]
  }),
  methods: {
    loadProjectFile: function() {
    }
  },
  mounted: function() {
    this.loadProjectFile();
  }
}


</script>
지금까지 진행한 것을 확인해본다.
yarn electron:serve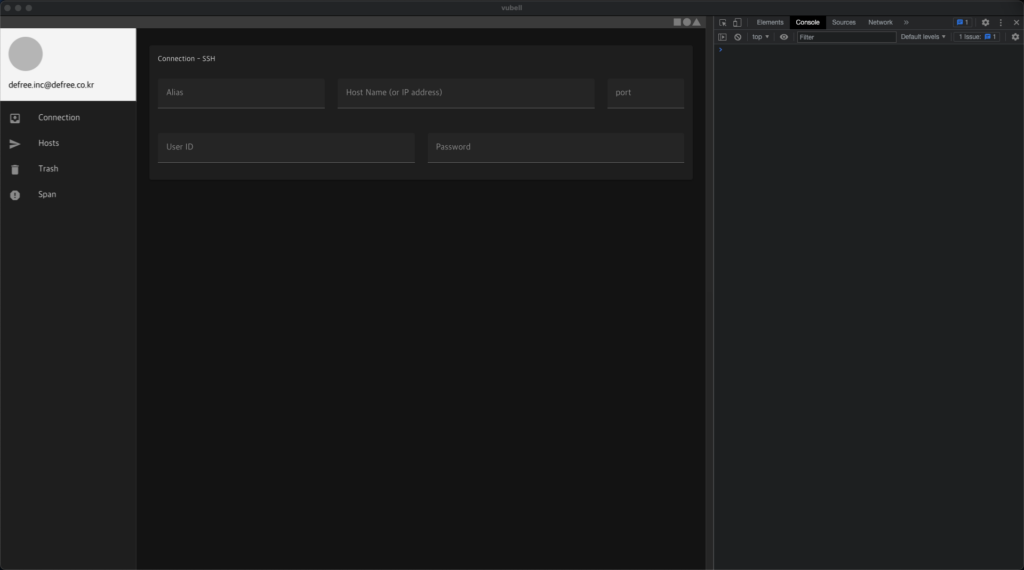
답글 남기기